$4,000 With Free Traffic: How To Collect Email Addresses To Boost Your Sales

How to collect your website visitors’ email addresses quickly and easily? That’s a really important question for every online business owner, and we’re happy to cover it in our today’s article!
What ways do you usually use to promote your eCommerce store? The most traditional ones are Facebook posts, Instagram pictures, SEO, and blog articles. However, most people forget about email marketing, which is definitely one of the biggest sales drivers and one of the best methods you can use to achieve success in eCommerce.
Check out these 7 powerful types of email subject lines that boost your open rates!
Email marketing is a core to your business – 3.7 billion people use emails on a regular basis and this number is expected to grow to 4.3 (!) billion by 2022. Actually, this is half of the world’s population, which you can easily turn into your clients! So you can’t miss out this great marketing tool. However, without building a massive email list, communicating with this audience and selling them your products will be impossible.
In this article, we’ll tell you how to collect email addresses on your website in the most powerful way and what we do to easily get at least 150 emails every week for free!
Let’s go!
5 ways to collect email addresses
To build your email list, you can:
- Place the subscription form in your website’s header or footer
- Ask your customers for emails to leave a comment
- Use emails as part of your payment process
- Offer discounts for registered users
- Use pop-ups
We have tested all these strategies and realised that the best way to collect email addresses is using pop-up ads.
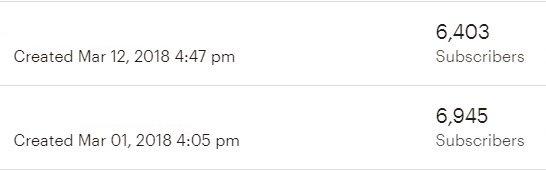
Using pop-ups on one eCommerce store only, we got more than 13,400+ subscribers! It cost us nothing, and the number of subscribers in this list is growing constantly.
We use these email addresses to promote our stores and make money on them.
According to our Google Analytics report, thanks to these emails, we have already earned $4,000!
Just think how much money they will bring us if every person on this list makes a $10 purchase! It is more than $120,000!
So we concentrate our efforts on this marketing strategy and want to share it with you.
How to get email addresses: effective pop-up ads
Pop-ups are those little boxes that appear on the screen while you’re comfortably reading a website.

Although sometimes they are really annoying for website visitors, they can bring you hundreds of email addresses. The main condition is to use them correctly. Here are some tips for you.
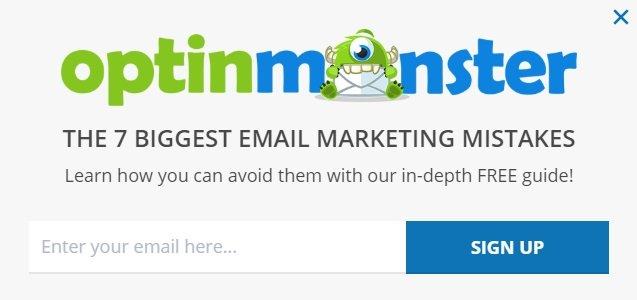
- Deliver the right message
Pop-ups seem less annoying when you offer people something valuable. Don’t simply write something like “Leave your email here” because this message makes no sense for your website visitors. If you really want to collect emails, you need to go smarter.
In exchange for your website visitors’ emails, you can:
- Offer discounts to your visitors

- Give them tips or guides
- Ask for your visitors’ advice

As you can see, we do not beg for emails! We offer people something that will be valuable or interesting for them, and they write emails to get what THEY want! Although this method isn’t new, it works very well. So, try it!
- Determine the best time
Timing is the most crucial aspect when placing pop-ups. On the one hand, if your ads appear too soon, they will interrupt your visitors. On the other hand, if they are displayed too late, you will lose a lot of new subscribers.
Although there is no perfect time to set up pop-up ads, we recommend you do the following. Go to Google Analytics, look at how much time people usually spend on your website, and divide this number by 2.
For example, the average time your visitors spend on a page is 1 minute and 14 seconds. So a pop-up must be displayed on the 38th second of the user’s presence on the site.

However, don’t dwell on this advice only! Feel free to experiment with various times of pop-ups appearance and see what works for you!
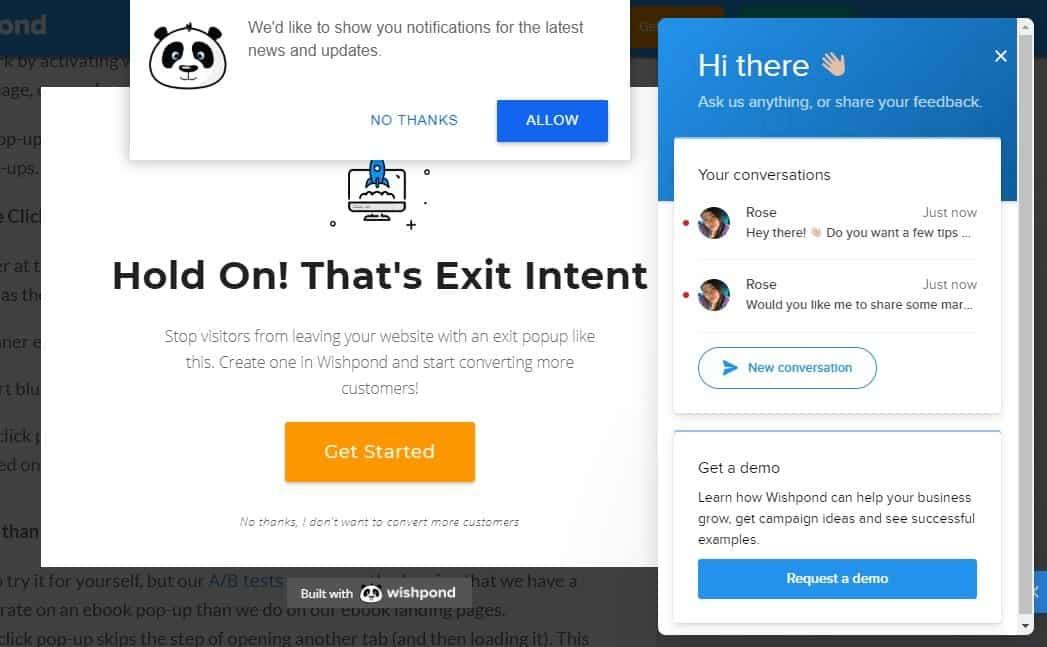
- Don’t place many pop-ups on one page
When website owners understand that pop-ups work, they start placing them everywhere. And this is really annoying. When I see 2-3 pop-ups on a homepage only, I start hating this website and the people who manage it. Due to thousands of pop-ups, I cannot read an article or take a closer look at the product I’m going to buy. So I usually leave this website and add it to my personal blacklist.
In order not to irritate your customers, create 1-2 pop-up ads and place them on absolutely different pages. For example, in our stores, we set up pop-ups on the homepage and on one of the checkout pages.
- Check how your pop-ups look like
After creating a pop-up ad, you need to check how it is displayed on different devices. It’s better to create both the desktop and the mobile versions of your ads. Otherwise, there is a great chance that some of your ads won’t be shown correctly.
If everything is ok, make sure that your pop-ups have a ‘Close’ button that actually works. This aspect is very important because not all your website visitors will be eager to leave their emails. In order not to drive your customers nuts and not to ruin your reputation, please, play by the rules!
How to collect email addresses: creating a pop-up ad
Now you know how a great pop-up should look like. It’s time to learn how to create it and start collecting emails. Here is a step-by-step guide on what you need to do.
Create a MailChimp account
Making a pop-up is not difficult, but you need to register accounts on different services. The first of them is MailChimp.
MailChimp is an email marketing service that is absolutely perfect for collecting emails. If you don’t have a Mailchimp account yet, it’s high time to create it.
Of course, you can also use other email marketing services like GetResponse, ActiveCampaign, or MailerLite to achieve this. But in our case, we are very happy with Mailchimp and that’s why we use them as an example in this tutorial.
After you go to the website and click the “Sign up” button, you will see a form. Fill it in and click the “Get started” button.
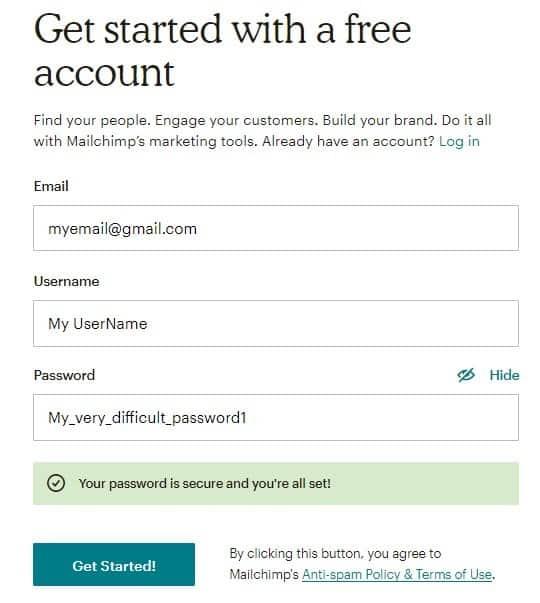
That’s it! Your account is ready to work. Log in and go to the next step.
Make an email list
MailChimp is a great service that has a lot of features. However, in this article we will focus only on those that help us collect email addresses. So, let’s click on the “Lists” button.
All the emails that you collect should be kept somewhere. In MailChimp, these places are called ‘lists’. You can create as many email lists as you need.
Click the ‘Lists’ button and create a new one.

You will see the following page. Fill out the following form:
- List name – as this is your first list, you can just write the name of your store (KawaiiStore) or indicate the type of your pop up (KawaiiStore $150 coupon);
- Default From email addresses – write an email address that will be used to interact with your customers;
- Default From name – this is who your emails will come from. We recommend you write the name of your eCommerce store.

Our list is ready. As you can see, we have no subscribers yet. So, we need to get them. Here, the OptinMonster service comes into play.
Create an OptinMonster account
OptinMonster is a service that will help you create pop-ups or any other great things to collect email addresses. It doesn’t matter what device your customers use – you can easily create both desktop and mobile-friendly ads.
Go to OptinMonster.com and click on the “Get started” button. OptinMonster is a paid service, so you need to choose the pricing plan that suits you the best. We recommend you start with the basic plan and change it if necessary.
Install OptinMonster plugin on your website
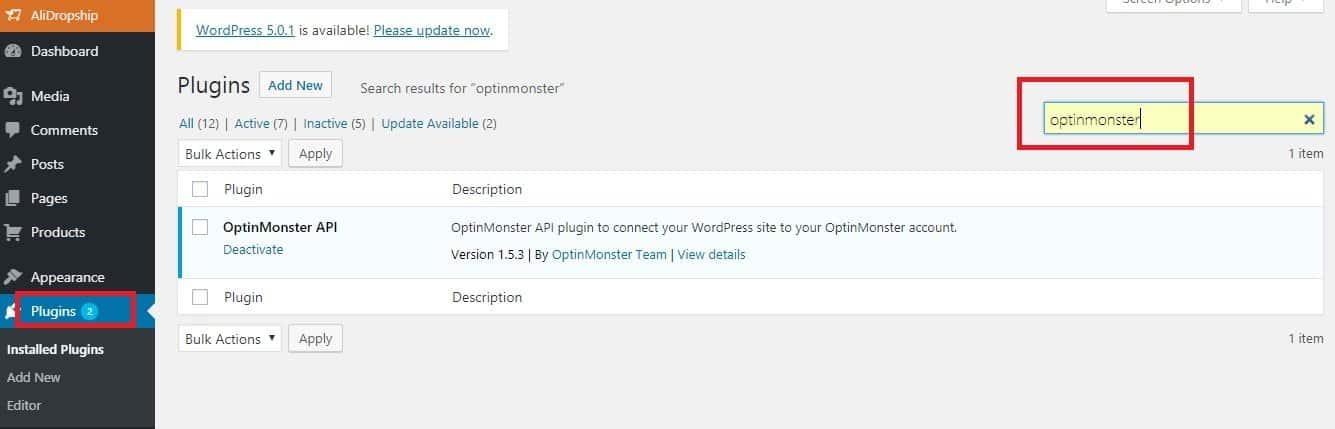
After creating an OptinMonster account, you need to connect it with your dropshipping store. For this purpose, you have to install the OptinMonster plugin on your eCommerce store.
Go to the Admin Panel of your store, click on the ‘Plugins’ tab and search for OptinMonster. Install it on your website.
Synchronize the plugin with your OptinMonster account
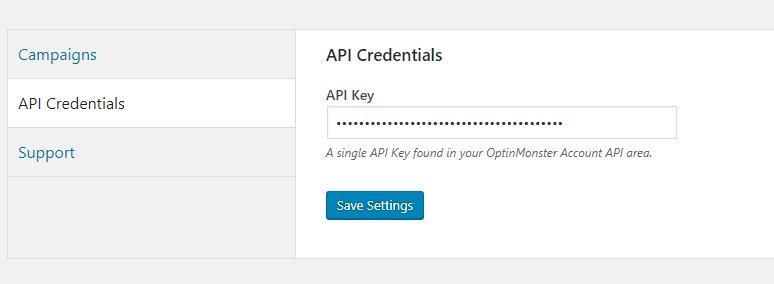
Now, you need to connect this plugin with your OptinMonster account. In order to do this, you need a special API key.
Go to the OptinMonster website, click your name at the top right, select the ‘My account’ option, and find the API menu. Create a new key.

Once you have created a key, go to your WordPress admin and paste it into the API field. Once you’ve authenticated your OptinMonster account, additional options will appear in the OptinMonster screen of your WordPress admin.
That’s it! It wasn’t easy but we did it
Let’s create your first pop-up ad!
Create a pop-up
Go to the OptinMonster website and click on the ‘Create Campaign’ button.

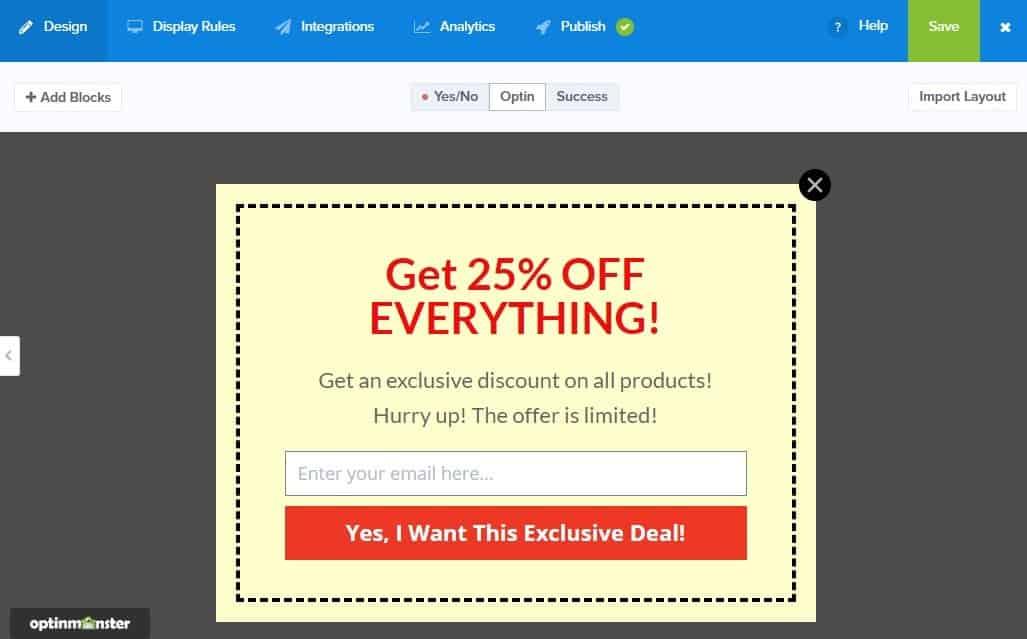
You will see a big menu with different campaign types. Click on the ‘Pop up’ version and select the template you need. For example, I want to offer my clients a discount and choose the following template.
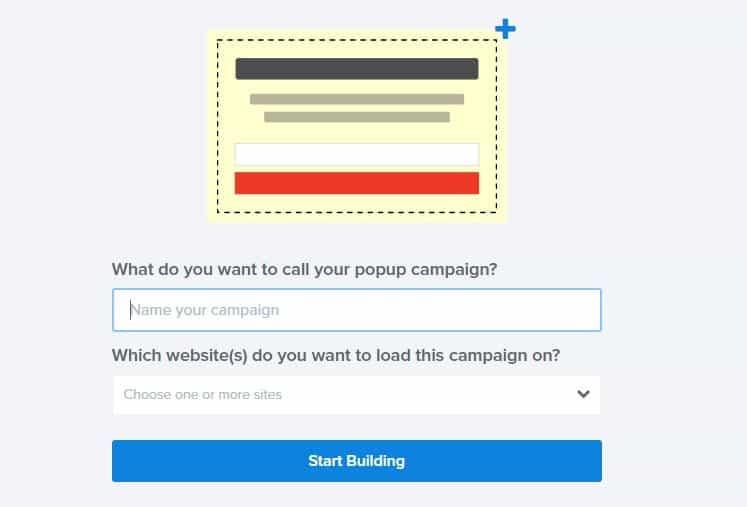
Write the name of your pop-up campaign and choose your website. Click on the ‘Start Building’ button.
You will see the following screen. Design your ad, write what you offer, and click ‘Save’.
Don’t forget to save all your changes after each step! Otherwise, you’ll lose all your progress 🙁
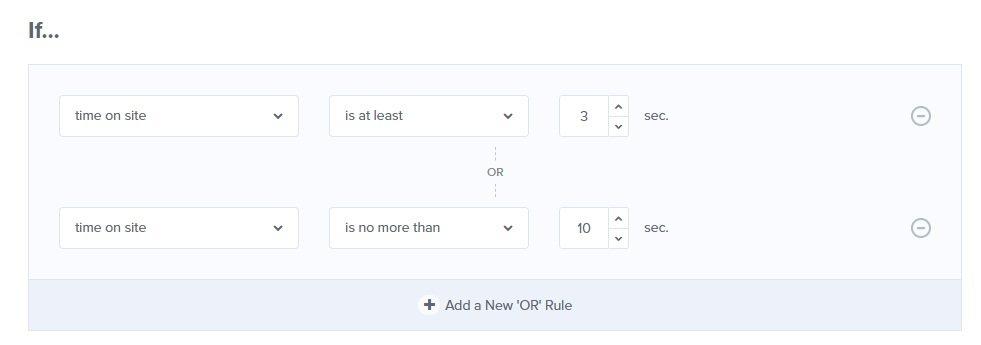
After that, you need to set up the display rules. As it was said before, it’s a good idea to show your pop-up halfway through the average time of being present on the site. For example, if people spend 60 seconds on your site, you need to show a pop-up on the 31st second. In order to discover the average time, go to Google Analytics.
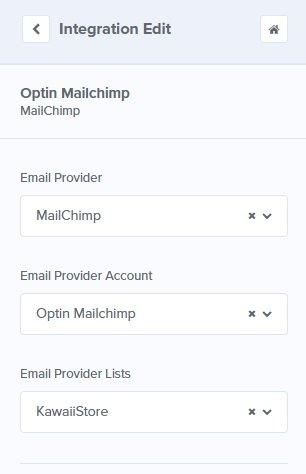
Connect your Mailchimp list with this pop-up. Choose an email provider, select your account and find the list that you’ve created in your MailChimp account. Click ‘Save’.
Go to the last tab and activate your pop-up!

My congratulations! Now all the emails left by the visitors in this pop-up will be collected!
It’s time to look at our efforts!

Wow! While I was writing this article, I got as many as 3 subscribers! And I think, it’s a good starting point for a person who has made a pop-up ad for the first time in her life 🙂 These people are a warm audience, so it’s quite likely that they’ll read my advertising emails and go to the website to make a purchase!
Now you know how to effectively collect email addresses on your website and create the best pop-ups ever. This strategy helped us get a lot of emails and I’m sure it will do the same for you! Try it right away and I bet you won’t be disappointed! If you have any questions or want to share your own experience of building an email list, feel free to leave your comment below.
Recommended for You